Data pipelines
Learn how to configure RDI for data capture and transformation.
RDI uses pipelines to implement change data capture (CDC). (See the architecture overview for an introduction to pipelines.) The sections below explain how pipelines work and give an overview of how to configure and deploy them.
How a pipeline works
An RDI pipeline captures change data records from the source database, and transforms them into Redis data structures. It writes each of these new structures to a Redis target database under its own key.
By default, RDI transforms the source data into hashes or JSON objects for the target with a standard data mapping and a standard format for the key. However, you can also provide your own custom transformation jobs for each source table, using your own data mapping and key pattern. You specify these jobs declaratively with YAML configuration files that require no coding.
Data transformation involves two stages:
- The data ingested during CDC is automatically transformed to an intermediate JSON change event format.
- RDI passes this JSON change event data to your custom transformation for further processing.
The diagram below shows the flow of data through the pipeline:

You can provide a job file for each source table that needs a custom transformation. You can also add a default job file for any tables that don't have their own. You must specify the full name of the source table in the job file (or the special name "*" in the default job) and you can also include filtering logic to skip data that matches a particular condition. As part of the transformation, you can specify any of the following data types to store the data in Redis:
Pipeline lifecycle
After you deploy a pipeline, it goes through the following phases:
- Deploy - when you deploy the pipeline, RDI first validates it before use. Then, the operator creates and configures the collector and stream processor that will run the pipeline.
- Snapshot - The collector starts the pipeline by creating a snapshot of the full dataset. This involves reading all the relevant source data, transforming it and then writing it into the Redis target. This phase typically takes minutes to hours if you have a lot of data.
- CDC - Once the snapshot is complete, the collector starts listening for updates to the source data. Whenever a change is committed to the source, the collector captures it and adds it to the target through the pipeline. This phase continues indefinitely unless you change the pipeline configuration.
- Update - If you update the pipeline configuration, the operator applies it to the collector and the stream processor. Note that the changes only affect newly-captured data unless you reset the pipeline completely. Once RDI has accepted the updates, the pipeline returns to the CDC phase with the new configuration.
- Reset - There are circumstances where you might want to rebuild the dataset completely. For example, you might want to apply a new transformation to all the source data or refresh the dataset if RDI is disconnected from the source for a long time. In situations like these, you can reset the pipeline back to the snapshot phase. When this is complete, the pipeline continues with CDC as usual.
Using a pipeline
Follow the steps described in the sections below to prepare and run an RDI pipeline.
1. Prepare the source database
Before using the pipeline you must first prepare your source database to use the Debezium connector for change data capture (CDC). See the architecture overview for more information about CDC. Each database type has a different set of preparation steps. You can find the preparation guides for the databases that RDI supports in the Prepare source databases section.
2. Configure the pipeline
RDI uses a set of YAML files to configure each pipeline. The following diagram shows the folder structure of the configuration:
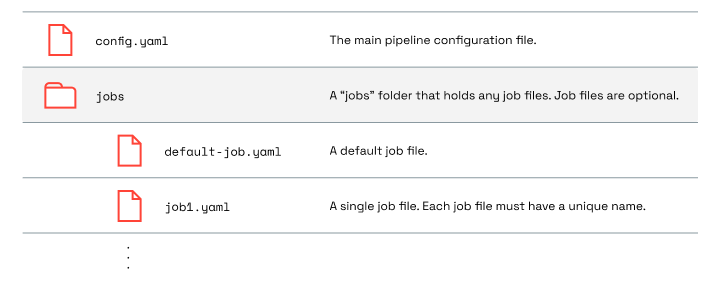
The main configuration for the pipeline is in the config.yaml file.
This specifies the connection details for the source database (such
as host, username, and password) and also the queries that RDI will use
to extract the required data. You should place job files in the Jobs
folder if you want to specify your own data transformations.
See
Pipeline configuration file
for a full description of the config.yaml file and some example configurations.
3. Create job files (optional)
You can use one or more job files to configure which fields from the source tables you want to use, and which data structure you want to write to the target. You can also optionally specify a transformation to apply to the data before writing it to the target. See the Job files section for full details of the file format and examples of common tasks for job files.
4. Deploy the pipeline
When your configuration is ready, you must deploy it to start using the pipeline. See Deploy a pipeline to learn how to do this.
More information
See the other pages in this section for more information and examples: